README
Deploy a Kubernetes cluster with Ansible.
Summary
This repo builds a generic Kubernetes cluster based on dynamic inventory generated by https://gitlab.com/ska-telescope/sdi/heat-cluster, which in turn relies on ansible collections from https://gitlab.com/ska-telescope/sdi/systems-common-roles .
Checkout cluster-k8s (this repo) and pull the dependent collections with:
git clone git@gitlab.com:ska-telescope/sdi/cluster-k8s.git
cd cluster-k8s
make install
This then needs an ansible vars file that describes the cluster to be built, and to know where to write out the dynamic inventory describing the nodes in the cluster.
Ansible vars for the cluster
In order to define the architecture of the cluster, one needs to describe, at a minimum, the loadbalancer, master and worker nodes of which the cluster will be comprised of.
In dev_cluster_vars.yml, it is described a cluster containing 1 loadbalancer (there is always just 1), 1 master and 1 worker. Masters can be scaled out in odd numbers. Workers can be any number. It is suggested to use this file as a starting point for defining and creating a new cluster.
Certificate Management
Although there is a predefined certificate defined in
dev_cluster_vars.yml, it is suggested that you generate
your own k8s_certificate_key, with kubeadm alpha certs certificate-key.
For more information on the subject read Certificate Management with kubeadm.
Ansible inventory file
Creating a new cluster by using this playbook, will add the necessary entries, generated by heat-cluster, specifying the new machines in inventory_dev_cluster.
These entries can then be used to add the necessary ssh keys for access to the newly created cluster with the use of distribute-ssh-keys (more on that later).
Setting your OpenStack environment
First you will need to install openstacksdk in order to be able to create the VMs using openstack (using heat-cluster).
sudo apt install python-openstackclient
Then, download your OpenStack RC File v3 from the
OpenStack Dashboard into your cluster-k8s
working directory: 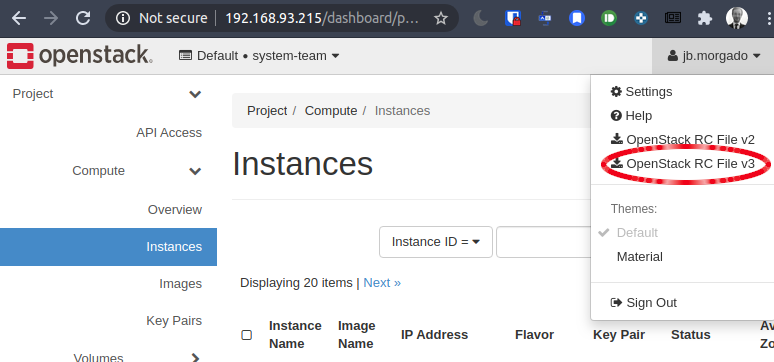
Change the name of the *-openrc.sh file for easier usage:
mv *-openrc.sh to openrc.sh
Then source openrc.sh and test connectivity (it will ask you for a password, use your OpenStack access password):
source ./openrc.sh
openstack server list
The openstack environment variables (set by the openrc.sh file) default
values are:
OS_AUTH_URL: "http://192.168.93.215:5000/v3/"
OS_PROJECT_ID: "988f3e60e7834335b3187512411d9072"
OS_PROJECT_NAME: "system-team"
OS_USER_DOMAIN_NAME: "Default"
OS_PROJECT_DOMAIN_ID: "default"
OS_REGION_NAME: "RegionOne"
OS_INTERFACE: "public"
OS_IDENTITY_API_VERSION: 3
The variables with no defaults are:
OS_USERNAME: the openstack username of the user who will access the openstack api
OS_PASSWORD: the openstack password of the user who will access the openstack api
Also, you need to make sure that the OpenStack account used has the
stack_owner, as well as the member (sometimes _member) roles.
Referencing custom configuration
In order not to have to specify the CLUSTER_KEYPAIR, PRIVATE_VARS and
INVENTORY_FILE variables every time a make command is issued, create the
PrivateRules.mak file in the cluster-k8s root directory specifying these
three variables (these need to be changed accordingly to each specific
purpose):
CLUSTER_KEYPAIR=your-openstack-key-name
PRIVATE_VARS=./dev_cluster_vars.yml
INVENTORY_FILE=./inventory_dev_cluster
Note: your-openstack-key-name should be the one defined under OpenStack
Key Pairs.
Running the build
The build process is broken into two phases:
create the cluster of VMs, and do the common install steps
build the HAProxy loadbalancer and the Kubernetes Cluster
This can be run simply with:
make build
Or, in case you didn’t define the PrivateRules.mak with:
make build CLUSTER_KEYPAIR=your-openstack-key-name PRIVATE_VARS=./dev_cluster_vars.yml INVENTORY_FILE=./inventory_dev_cluster
You can also break the make build command into the three steps comprising it:
# create the VMs and do the common install
make build_nodes
# build the loadbalancer
make build_haproxy
# build the Kubernetes cluster
make build_k8s
Customising Namespaces, Limit Range and Resource Quotas
The created cluster will have the default Limit Range and Resource Quotas defined in the systems-common-roles/systems_k8s role.
In order to override default values, fill in the variables specified by the PRIVATE_VARS variable (default: dev_cluster_vars.yml) file or run make apply_resource_quotas anytime providing the cluster is created.
You can also use this target with only extractvalues tag (i.e. make apply_resource_quotas TAGS=extractvalues) so that only the csv and json files are created without creating namespaces and applying quotas.
Note: These variables are commented out as not to conflict with default variables.
Variables:
chart_urlandchart_dir: Used as described above to define the Helm Chartcharts_namespaces: Namespaces to be createdcharts_quotas_*: Default total values of resources to be applied to the namespaces. These values are overridden if a chart is defined with above variables.memory_format: Memory size format. Set this true if you want csv file memory format to be human readable. It is false by default to enable easy calculations on values
How to use
If chart_url variable is defined, then the values are extracted from the helm chart from the url.
chart_url can be either a git repository or a packaged helm chart.
If the Helm chart is a git repository then chart_dir (top-level folder of the chart) should be defined to define where to search for the helm chart.
Then, the helm chart is templated using --dependency-update flag set to cover dependencies as well.
Total values are extracted and a csv file(named resources.csv) for all the apps are created in the directory of the playbook with a json file(named resources.json) defining total values unless current_dir is defined.
Deploy the SSH access keys on the newly created cluster
After creating the cluster, only the user issuing the build commands specified above, will have access to the cluster.
In order to have a group of users (usually your team) being able to login into the various VMs that were created, it is needed to distribute their respective ssh keys into those VMs.
To do this, one needs to use the functionality provided by the distribute-ssh-keys SKA repository.
It is beyond the scope of this README to explain all the functionality of the distribute-ssh-keys repo, but for this specific purpose one needs to accomplish the following steps:
1: Modify the inventory-ssh-keys in the distribute-ssh-keys repo
When issuing the build command(s) specified above, the file specified by the INVENTORY_FILE variable (inventory_dev_cluster by default) is automatically updated with the newly created VMs:
[cluster:children]
k8s_dev_cluster_loadbalancer
k8s_dev_cluster_master
k8s_dev_cluster_worker

[k8s_dev_cluster_loadbalancer]
k8s-dev-cluster-loadbalancer-0 ansible_host=192.168.93.137 docker_vol_diskid="5fca38ce-3edc-4fe8-b" data_vol_diskid="11c94e16-8482-47bc-a"  data2_vol_diskid=""

...

[k8s_dev_cluster_master]
k8s-dev-cluster-master-0 ansible_host=192.168.93.106 docker_vol_diskid="0b53dc74-5709-46c8-b" data_vol_diskid="30e1928c-3bfd-43c4-b"  data2_vol_diskid=""
k8s-dev-cluster-master-1 ansible_host=192.168.93.130 docker_vol_diskid="e8c4b3c3-8166-4cc6-b" data_vol_diskid="ce5116d7-3c87-40af-9"  data2_vol_diskid=""
k8s-dev-cluster-master-2 ansible_host=192.168.93.24 docker_vol_diskid="cd976a69-d37b-4492-b" data_vol_diskid="b48fa69c-37e1-4a18-9"  data2_vol_diskid=""

...

[k8s_dev_cluster_worker]
k8s-dev-cluster-worker-0 ansible_host=192.168.93.125 docker_vol_diskid="e75f9f0f-ccaa-46a9-a" data_vol_diskid="d98e0d88-8b57-47c7-9"  data2_vol_diskid=""
k8s-dev-cluster-worker-1 ansible_host=192.168.93.119 docker_vol_diskid="db5236ce-4769-47bb-8" data_vol_diskid="76b5aba6-af41-4416-b"  data2_vol_diskid=""
k8s-dev-cluster-worker-2 ansible_host=192.168.93.85 docker_vol_diskid="92f1f155-2c6c-494d-a" data_vol_diskid="3eeef438-f6cd-44a4-a"  data2_vol_diskid=""

...

# Specific roles for cluster deployment assignments
[cluster_nodes:children]
k8s_dev_cluster_loadbalancer
k8s_dev_cluster_master
k8s_dev_cluster_worker
In this particular example, you need to add these newly created machines into the inventory-ssh-keys in the distribute-ssh-keys repo by creating a new section similar to the following:
# K8s dev cluster - k8s-dev-cluster
[k8s_dev_cluster_loadbalancer]
k8s-dev-cluster-loadbalancer-0 ansible_host=192.168.93.137

[k8s_dev_cluster_master]
k8s-dev-cluster-master-0 ansible_host=192.168.93.106
k8s-dev-cluster-master-1 ansible_host=192.168.93.130
k8s-dev-cluster-master-2 ansible_host=192.168.93.24

[k8s_dev_cluster_worker]
k8s-dev-cluster-worker-0 ansible_host=192.168.93.125
k8s-dev-cluster-worker-1 ansible_host=192.168.93.119
k8s-dev-cluster-worker-2 ansible_host=192.168.93.85

[k8s_dev_cluster:children]
k8s_dev_cluster_loadbalancer
k8s_dev_cluster_master
k8s_dev_cluster_worker

[k8s_dev_cluster:vars]
ansible_python_interpreter=python3
ansible_user=ubuntu
2: Add your keys to the ssh_key_vars.yml in the distribute-ssh-keys repo
You then need to specify which keys will be distributed among the new nodes. In order to do so, you add a new entry to the ssh_key_vars.yml file, like such:
# Bruno
  - ssh-rsa AAAAB3NzaC1yc2EAAAADAQABAAACAQDI5IHBq3DUh97aWzSAlBFov5FaNtgut6oW9QvZ7NRFplhskKqze57xcWOkL0y22n1Rao3bqZBkC4cjwm5x0kqAN+nsDRK/PB5blAUB8DJEJXz19py3pVb3BML2PBHYN+p/wqCNoKu2n22grmYphVnY5rjjgW4K4Y8AkBa8vv4YzyFvXrPRp4GD3THelkM7YsgnlZsU/QHw7rxOtWRTpeM4U4ZVdLmHWG45L1x/FjFvnsLSMGipRIaY0Oy/bC+29MCGRFZYrojSmy8KOPxjEBmwyrRe8ooDRtMtkMLQDCD8baidLnIv2yM+BdZXHBXh22f4YHJMakoPwC3n57o5x/NUAjn+0DRdgmjhimQFdh6Untd1kAnfQOd6kl/IMKyiJBZd8HacVF5XdIn9kc6l98d05uqZM71noHusHlvLKv0dtbCCM7myNmIPotT4albEJGAv22+siN8awLxepOYOBFL5sOsEWl6HnISziHUDIXmoe2qX6j0hFE9YH1ZM8sBALWx2+4sRJAljArItOj7+I0KqxUnAOAn4/KmACaH7mKiBLtq0wwW8xxoibLWFCX8C3VIFS3GOWrQU/Q49XSC3RNqqc7VgW1xZjYYb3BELT5tPMJbH3hKilfrg5NqWPj/2TDFDS6Za1QhIPbyMSxvfkf8usAqLVRW7nF4Q+UcazVg2nQ== jb.morgado@gmail.com bruno
Warning: This must be done locally, only the System Team should update the distribute-ssh-keys repo on GitLab.
3. Distribute the new keys
Now the only thing left is to distribute the keys among the nodes you added
to the inventory_ssh_keys file. In our case, since we defined the
k8s_syscore:children structure with reference to our new machines, we can
just issue:
make add NODES=k8s_syscore
You now should be able to login in any of the new nodes by doing (we will use the loadbalancer ip address on our example 192.168.93.137):
ssh 192.168.93.137
Destroying the nodes
Caution: The following command deletes everything that was installed and destroys the all cluster specified by the PRIVATE_VARS variable.
In case you want to delete the all stack issue the make clean command.
Help
Run make to get the help:
make targets:
Makefile:build                 Build nodes, haproxy and k8s
Makefile:build_charts          Build charts
Makefile:build_common          apply the common roles
Makefile:build_docker          apply the docker roles
Makefile:build_haproxy         Build haproxy
Makefile:build_k8s             Build k8s
Makefile:build_nodes           Build nodes based on heat-cluster
Makefile:check_nodes           Check nodes based on heat-cluster
Makefile:clean_k8s             clean k8s cluster
Makefile:clean_nodes           destroy the nodes - CAUTION THIS DELETES EVERYTHING!!!
Makefile:help                  show this help.
Makefile:install               Install dependent ansible collections
Makefile:lint                  Lint check playbook
Makefile:reinstall             reinstall collections
Makefile:test                  Smoke test for new created cluster
Makefile:vars                  Variables

make vars (+defaults):
Makefile:ANSIBLE_USER          centos## ansible user for the playbooks
Makefile:CLUSTER_KEYPAIR       piers-engage## key pair available on openstack to be put in the created VMs
Makefile:COLLECTIONS_PATHS     ./collections
Makefile:CONTAINERD            true
Makefile:DEBUG                 false
Makefile:EXTRA_VARS ?=
Makefile:IGNORE_NVIDIA_FAIL    false
Makefile:INVENTORY_FILE        ./inventory_k8s##inventory file to be generated
Makefile:NVIDIA                false
Makefile:PRIVATE_VARS          ./centos_vars.yml##template variable for heat-cluster
Makefile:TAGS ?=
Extending the Kubernetes Cluster
From time to time we may want to add additional nodes to a Kubernetes cluster. To do this we need to follow a number of steps (using the example of the syscore cluster):
all steps must be performed from the
bifrost. Usetmuxto save painful experiences.source your login for the OpenStack cluster
ensure that your
PrivateRules.makfile contains the entries:
## Production
PRIVATE_VARS = k8s_system_core_vars.yml
INVENTORY_FILE = ./inventory_k8s_system_core
CLUSTER_KEYPAIR = <your key pair>
update your local ansible collections with
make reinstalllogin to
k8s-syscore-master-0and generate a new certificate key usingkubeadm alpha certs certificate-keyamend the cluster instance vars file
k8s_system_core_vars.ymlto include thek8s_certificate_keyand to increment the number of workersgenericnode_worker.num_nodes. DO NOT ALTER THEflavor,imageornameIT WILL NOT WORK!!!make build_nodesCheck new nodes have been added via the OpenStack API - resize if required
make build_k8sCheck the progress by running something like
watch kubectl get nodes -o wide- see the nodes come in and switch toReady.Once the nodes are up and running and integrated in the cluster, we now add logging
Switch to a checked out version of
cluster-elasticstackAmend the
inventory_loggingfile to include the additional nodes declared incluster-k8s/inventory_k8s_system_corecopy
/etc/kubernetes/admin.conffrommaster-0to the same file on all the new worker nodes.run
make logging NODES=k8s_syscore_workerto add the logging to the new workersSwitch to a checked out version of
deploy-gitlab-runnersAmend the
inventory_runnersfile to include the additional nodes declared incluster-k8s/inventory_k8s_system_corerun
make dockerto prepare the worker nodes for the gitlab docker instance - note: it is possible that theTASK [restart docker-for-gitlab]will fail for existing nodes as they will be in use, but the restart must work for the new nodes.run
make label_nodesto add theci-runnerlabel to new worker nodesEnsure that the worker nodes are not tainted eg:
kubectl taint node k8s-syscore-worker-NN node-role.kubernetes.io/master=true:NoSchedule-. Check withkubectl describe nodes k8s-syscore-worker-NN.Switch to a checked out version of
deploy-prometheusrun
make node-exporter INVENTORY_FILE=../cluster-k8s/inventory_k8s_system_core NODES=k8s-syscore-worker-##to install the node_exporter (replace ## with the new worker number)distribute ssh keys for the new nodes
Finally, don’t forget to commit all the changes to
cluster-k8s,deploy-gitlab-runnersandcluster-elasticstack